I was interviewing a few candidates which had OCP in their resume but even though they had good theoretical knowledge but lack in hands-on. One of the candidate frankly told me that without job how to get hands on. And this post is the answer to his valid question.
63 STEPS to create your own test environment
We would start by installing Oracle Linux 7 using a Oracle VM Virtual Box:-
First of all download Oracle VM Virtual BOX (comment below if you aren’t able to download a copy) compatible to your operating system.
For instance in my env. the OS is windows 7 (Host Operating System) and we are first going to create a new Virtual Machine with Oracle Linux 7 Operating System (Guest Operating System).
Once Oracle VM Virtual Box is downloaded and installed (comment below if you have any issues with this), Open VirtualBox and it would be something like:-
Above Slide show will guide you to create a VM in Virtual Box. Once you have created the VM and chosen the Machine Settings as per the Slides above, follow the below steps to Install OEL7 and then Install Oracle 12c and create a multitenant Database.
Step 1:- I have given the base settings for the VM as in the General, System, Display, Storage, Audio, Network, USB, etc. Choose as per your requirement. And then hit Start to boot the ISO.

Step 2:- The ISO of OEL 7 is booted, then choose the “Install Oracle Linux 7” option and press “enter” key.

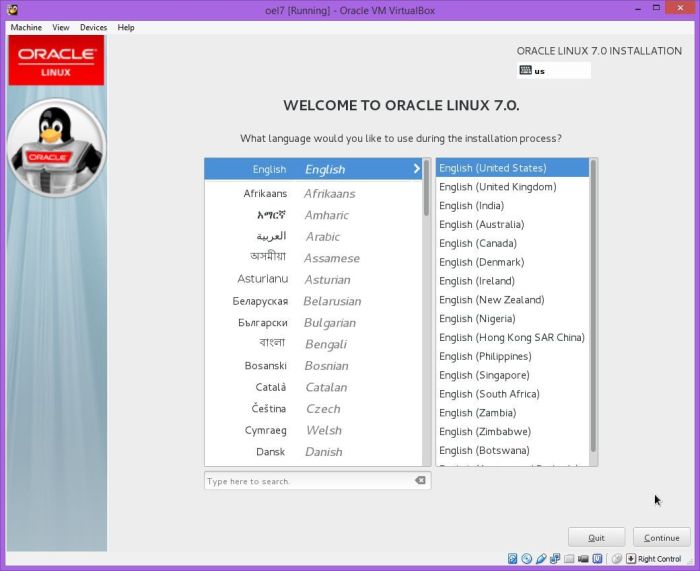
Step 3:- Then Select your language and clink “Continue” button.
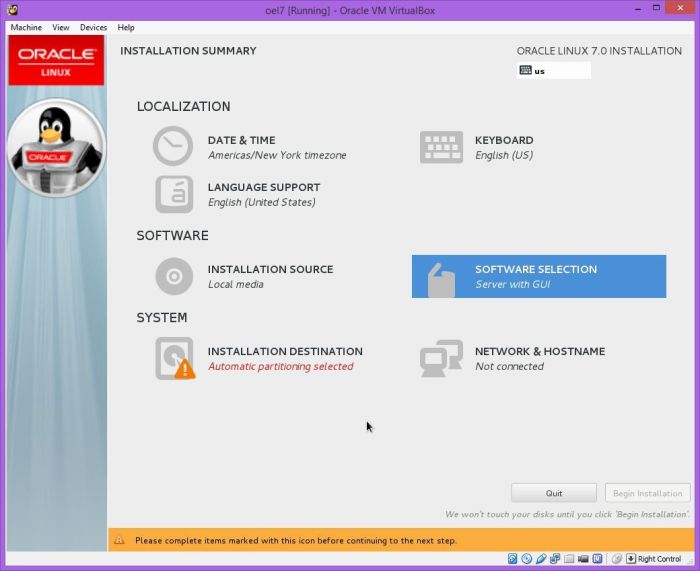
Step 4:- You should see “INSTALLATION SUMMARY” screen. Here you different options to configure, for e.g, date and time, keyboard, language support,installation source, software selection, installation destination, network and hostname.
First we would choose “SOFTWARE SELECTION” to select extra software for this installation

Step 5:- On “SOFTWARE SELECTION” screen select “Server with GUI” for your “Base Environment”. Then select extra software you want to install by selecting it in “Add-Ons for Selected Environment”.
For Oracle software installation and general development on Oracle Linux 7 please choose the below option and When you are ready click “Done” button.
File and Storage Server
Java Platform
Large Systems Performance
Network File System Client
Performance Tools
Compatibility Libraries
Development Tools

Step 6:- Once you are through with software selection you are back on “INSTALLATION SUMMARY” screen” so click “NETWORK CONFIGURATION” to setup network.

Step 7:- Enter Hostname and set “ON” switch for Ethernet card then click “Configure” button to set details for network card.

Step 8:- In first tab “General” check checkbox “Automatically connect to this network when it is available” to activate this network card automatically after reboot. On tab “IPv4 Settings” and “IPv6 Settings” you can assign static ip address for your network card or just use default “Automatic (DHCP)”. Once through with the network configuration click “Save..” button to save your configuration then click “Done” button.

Step 9:- Again you are back on “INSTALLATION SUMMARY” screen” so click “INSTALLATION DESTINATION” to configure storage.

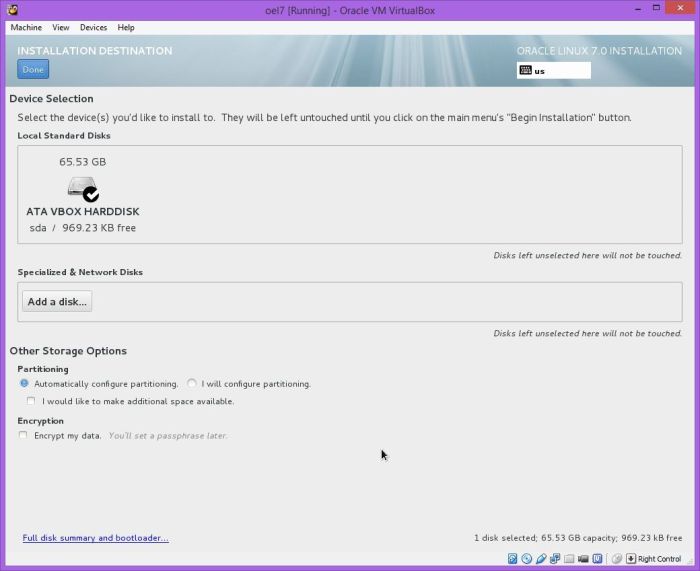
Step 10:- Select your disk to install Oracle. You can change partitioning here. When you are happy click “Done”.
Step 11:- Once through with all the options on the installation summary page, Click “Begin installation” button.
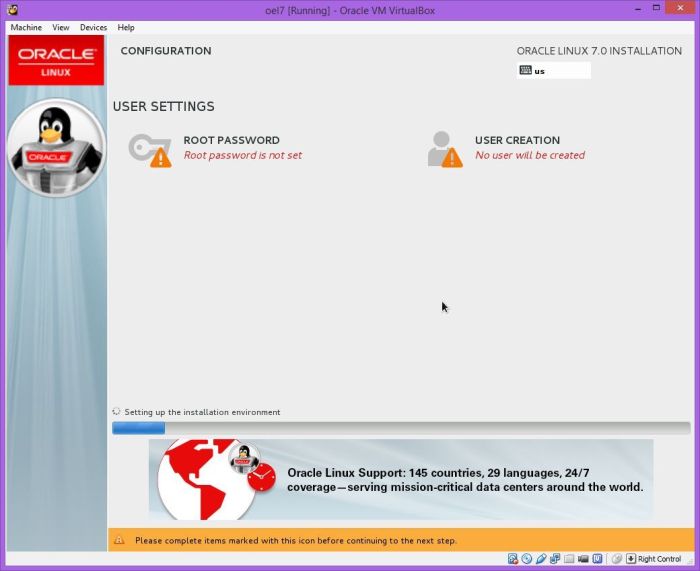
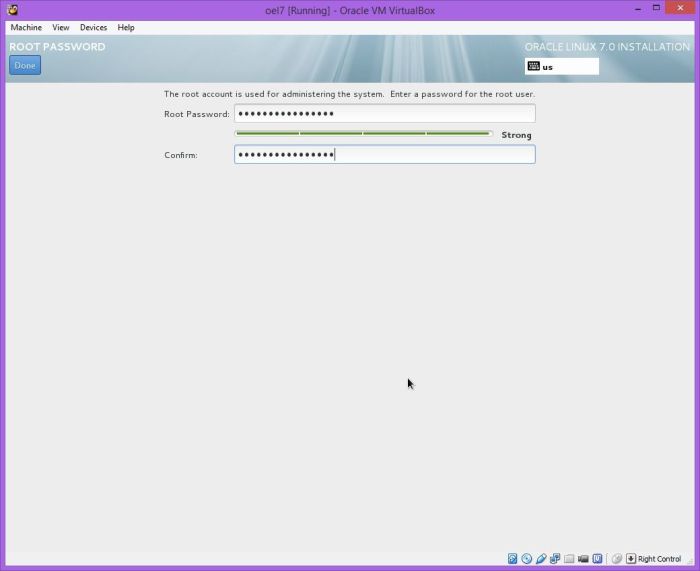
Step 12:- Then the Installation will start. Click “USER CREATION” to add extra user at the OS level. You need to change password for root user during installation. Click on “ROOT PASSWORD”. Set password for user root and press “Done”.

Step 13:- Now you should be back on “CONFIGURATION” screen. When installation is completed just click “Reboot” to restart machine.

Step 14:- After first reboot you should see following screen. Accept “License agreement” then click “FINISH CONFIGURATION” button.


Step 15:- Set Kdump settings then click “Forward” button.

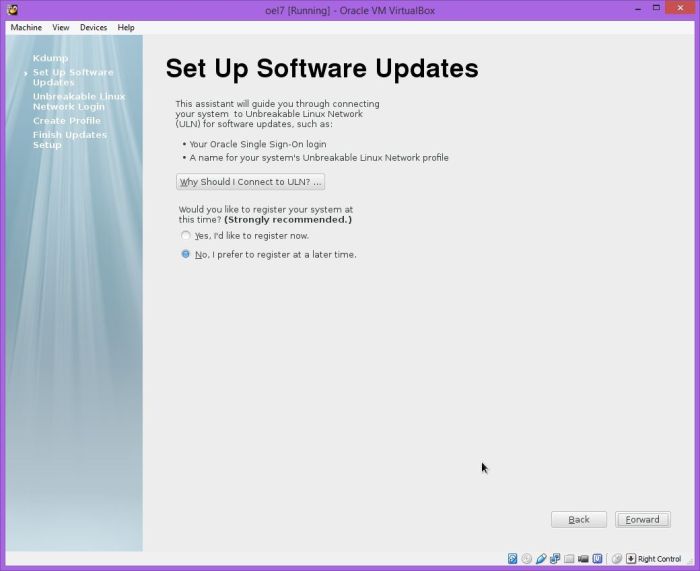
Step 16:- You can register this installation in Oracle to get later support.Click “Forward” button to continue.


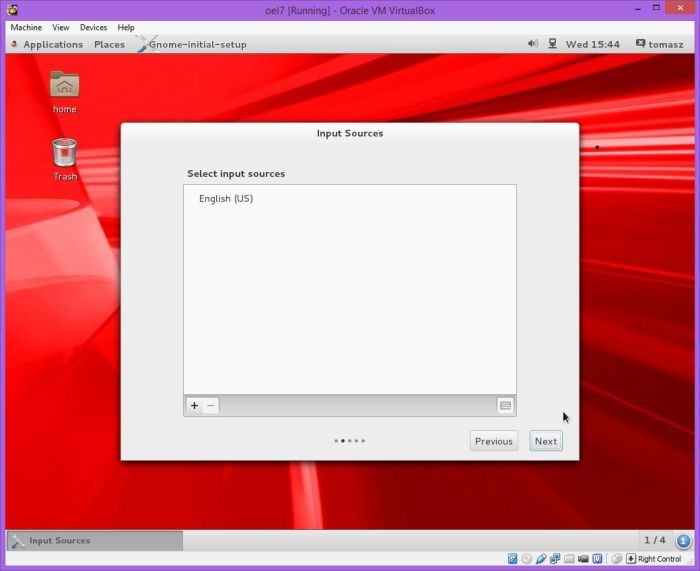
Step 17:- Now once you are logged in Choose your language preferences and click “Next” button.

Step 18:- Select your keyboard preferences. You can add here more keyboards if you click “+”. Click “Next” button to continue.
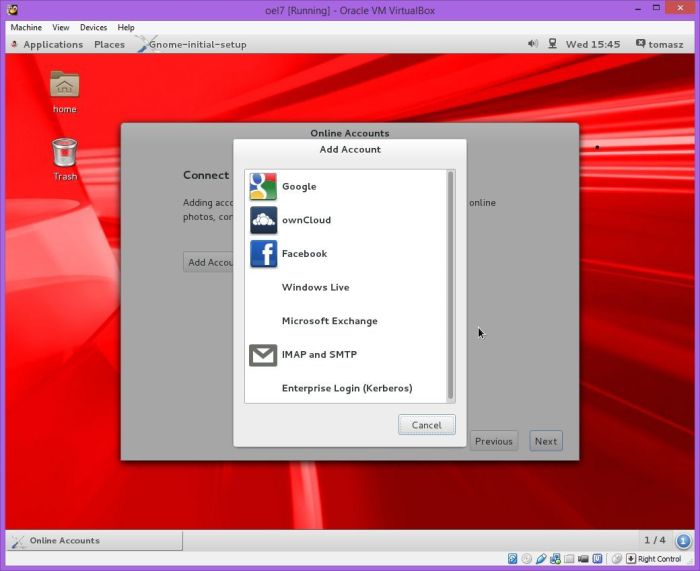
Step 19:- On the screen you can add your cloud accounts by clicking “Add Account” like google, facebook etc. I’m not showing details here how to do it only first screen after clicking “Add Account”. When you are ready click “Next”

Step 20:- Just click “Start using Oracle Linux Server″ button.

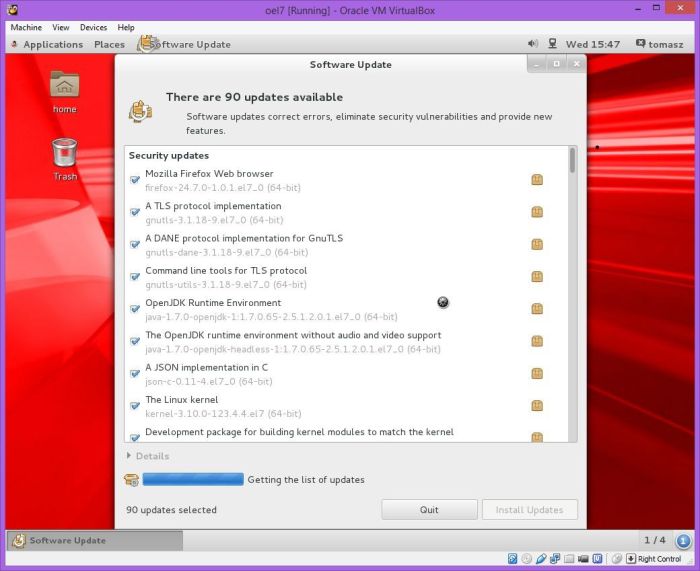
Step 21:- It makes sense to install latest patches just run “Applications->System Tools->Software Update”
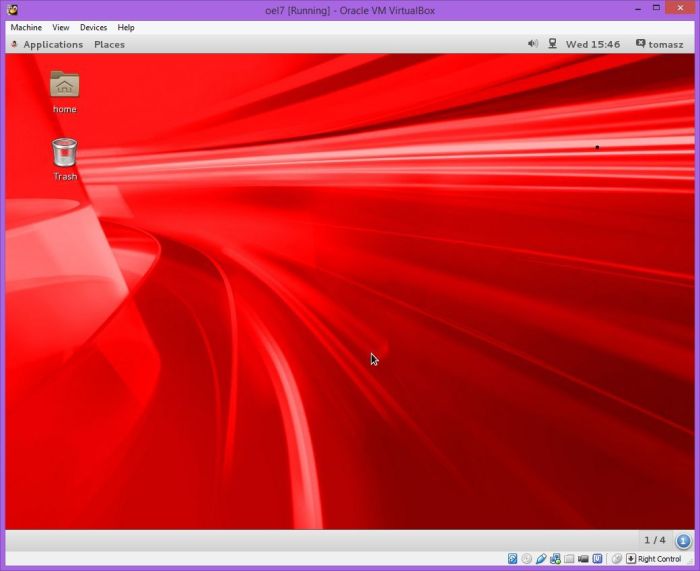
Step 22:- Your OEL7 is ready to use now.
Now that we have OEL7 machine with us we can proceed with the Oracle Database 12c installation.
Assuming you have downloaded the 12c software and extracted the 2 zip files under one directory.
Now preparing the OS for Oracle installation:-
Step 23:- Login as root.
Step 24:- Verify /etc/hosts, it should have an entry like:-
<IP-address> <fully-qualified-machine-name> <machine-name>
Step 25:- Add following groups:-
groupadd -g 54321 oinstall
groupadd -g 54322 dba
groupadd -g 54323 oper
groupadd -g 54324 backupdba
groupadd -g 54325 dgdba
groupadd -g 54326 kmdba
groupadd -g 54327 asmdba
groupadd -g 54328 asmoper
groupadd -g 54329 asmadmin
Step 26:- Create Oracle user and set password for the same:-
useradd -u 54321 -g oinstall -G dba,oper,backupdba,dgdba,kmdba oracle
passwd oracle
Step 27:- Check which packages are installed and which are missing:-
rpm -q –qf ‘%{NAME}-%{VERSION}-%{RELEASE}(%{ARCH})\n’ binutils \
gcc \
gcc-c++ \
glibc \
glibc-common \
glibc-devel \
glibc-headers \
ksh \
libaio \
libaio-devel \
libgcc \
libstdc++ \
libstdc++-devel \
libXext \
libXtst \
libX11 \
libXau \
libXi \
make \
sysstat \
unixODBC \
unixODBC-devel \
zlib-devel
If any rpm is missing, please install the same using yum:-
yum install libaio-devel*.x86_64
Step 28:- Edit sysctl.conf and add the below parameters:-
fs.file-max = 6815744
kernel.sem = 250 32000 100 128
kernel.shmmni = 4096
kernel.shmall = 1073741824
kernel.shmmax = 4398046511104
net.core.rmem_default = 262144
net.core.rmem_max = 4194304
net.core.wmem_default = 262144
net.core.wmem_max = 1048576
fs.aio-max-nr = 1048576
net.ipv4.ip_local_port_range = 9000 65500
kernel.panic_on_oops=1
Then execute:-
/sbin/sysctl -p
for the above changes to take effect immediately.
Step 29:- Add following line to /etc/security/limits.conf
oracle soft nofile 1024
oracle hard nofile 65536
oracle soft nproc 2047
oracle hard nproc 16384
oracle soft stack 10240
oracle hard stack 32768
Step 30:- Add the following line to /etc/pam.d/login
session required pam_limits.so
Step 31:- Add the following to /etc/selinux/config
SELINUX=permissive
Step 32:- Disable the firewall:-
service iptables stop
chkconfig iptables off
Step 33:- Add the following line in the bash_profile of oracle user:-
su – oracle
vi .bash_profile
# Oracle Settings
export TMP=/tmp
export ORACLE_HOSTNAME=oel7.dbaora.com
export ORACLE_UNQNAME=ORA12C
export ORACLE_BASE=/ora01/app/oracle
export ORACLE_HOME=$ORACLE_BASE/product/12.1.0/db_1
export ORACLE_SID=ORA12C
PATH=/usr/sbin:$PATH:$ORACLE_HOME/bin
export LD_LIBRARY_PATH=$ORACLE_HOME/lib:/lib:/usr/lib;
export CLASSPATH=$ORACLE_HOME/jlib:$ORACLE_HOME/rdbms/jlib;
alias cdob=’cd $ORACLE_BASE’
alias cdoh=’cd $ORACLE_HOME’
alias tns=’cd $ORACLE_HOME/network/admin’
alias envo=’env | grep ORACLE’
umask 022
if [ $USER = “oracle” ]; then
if [ $SHELL = “/bin/ksh” ]; then
ulimit -u 16384
ulimit -n 65536
else
ulimit -u 16384 -n 65536
fi
fi
envo
Step 34:- Make a directory structure as per your choice :-
mkdir -p /ora01/app/oracle/product/12.1.0/db_1
And accordingly change the ownership:-
chown oracle:oinstall -R /ora01
Step 35:- In Oracle Enterprise Linux 7 /tmp data is stored on tmpfs which consumes memory and is too small in size but you can revert it back to storage by just running the following command and REBOOT machine to be effective.
systemctl mask tmp.mount
Step 36:- Now we are through with the OS setup so now lets proceed with running the OUI.
su – oracle
Unzipping the Software (The 2 zip files) would create a directory called as database, that would have the binaries for installing Oracle 12c.
./runInstall
Step 37:- Uncheck checkbox “I wish to receive security updates via My Oracle Support” and then click “Next” button.

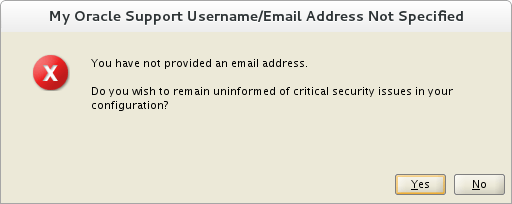
Step 38:- Ignore following message and click “Yes” button.
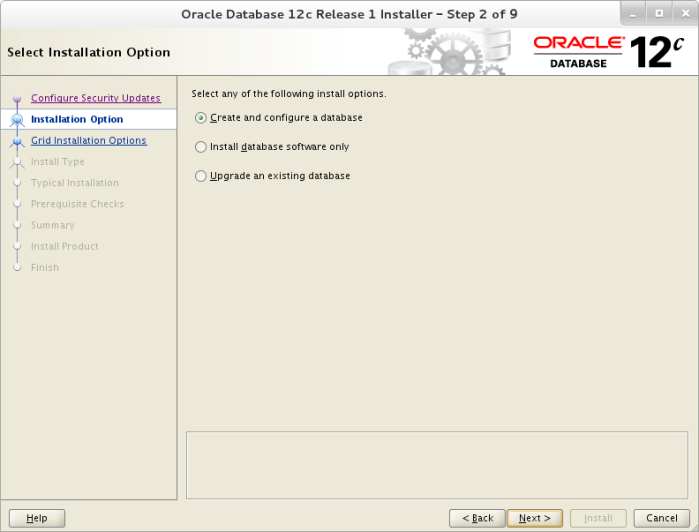
Step 39:- Select “Create and configure a database” then click “Next” button.
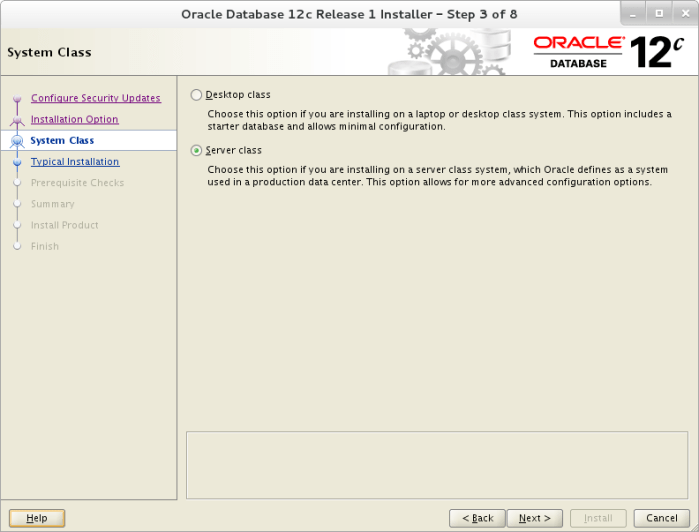
Step 40:- Choose “Desktop class” or “Server class” and click “Next” button.
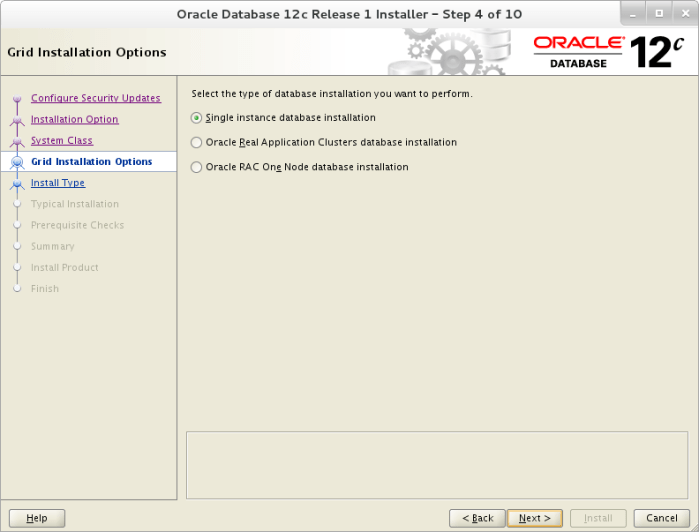
Step 41:- Accept default “Single instance database installation” and click “Next” button.
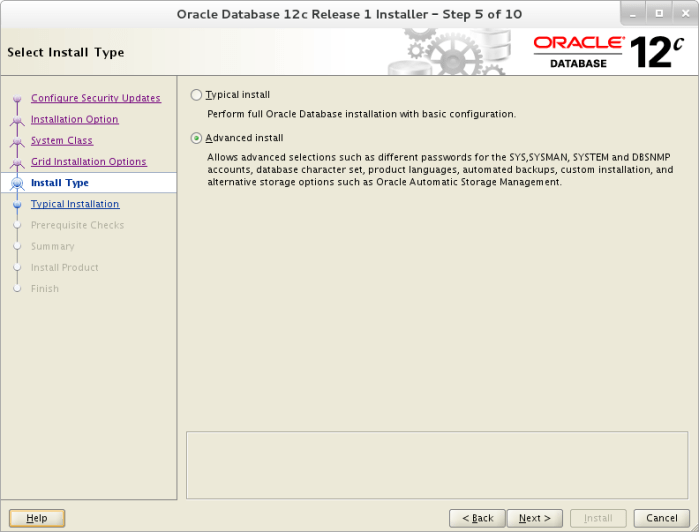
Step 42:- Select “Advanced install” to later select more options during database installation and click “Next” button.
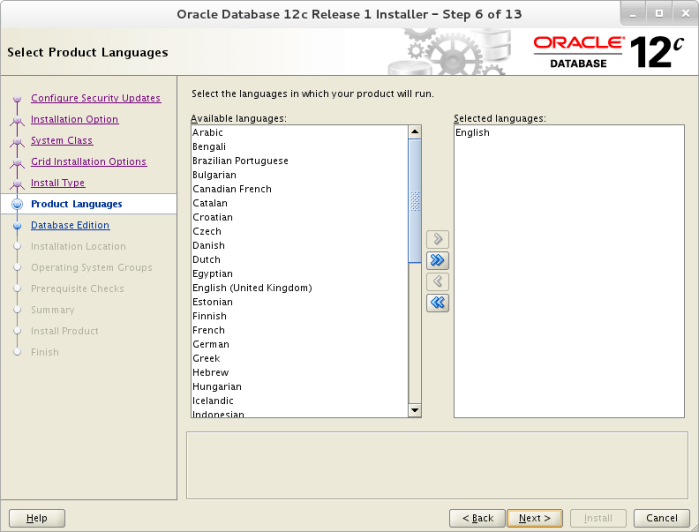
Step 43:- Select language here. Once it’s done click “Next” button.
Step 44:- Select here Edition you want to install. Once it’s done click “Next” button.

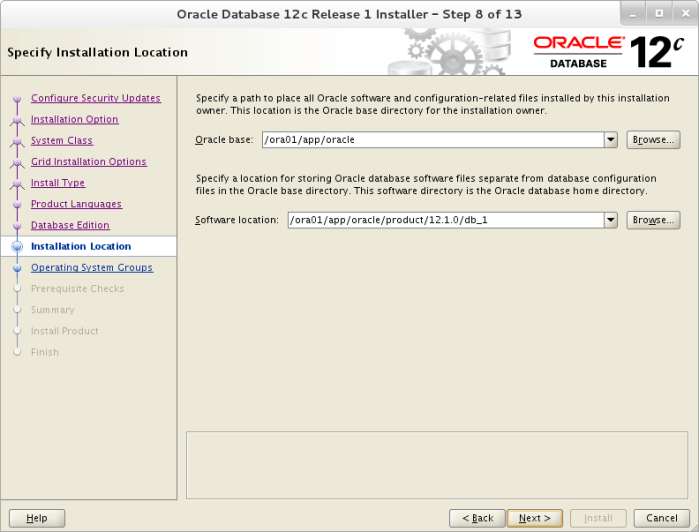
Step 45:- Browse or explicitly mention the Directories for Oracle Home and Oracle Base. Once done click “Next” button.
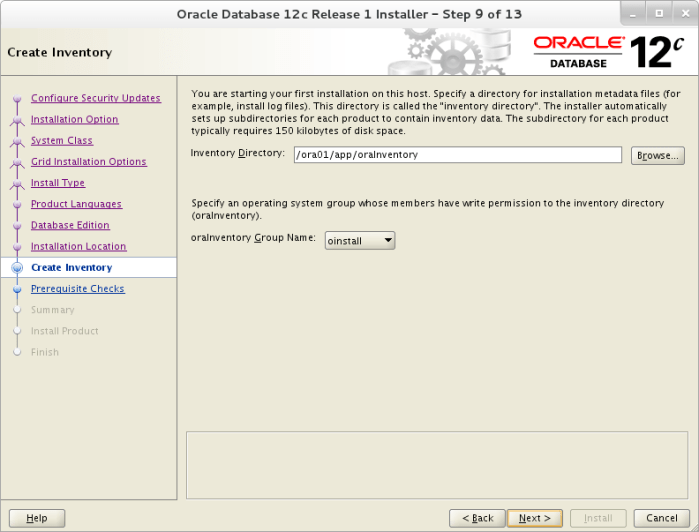
Step 46:- Accept default and click “Next” button.
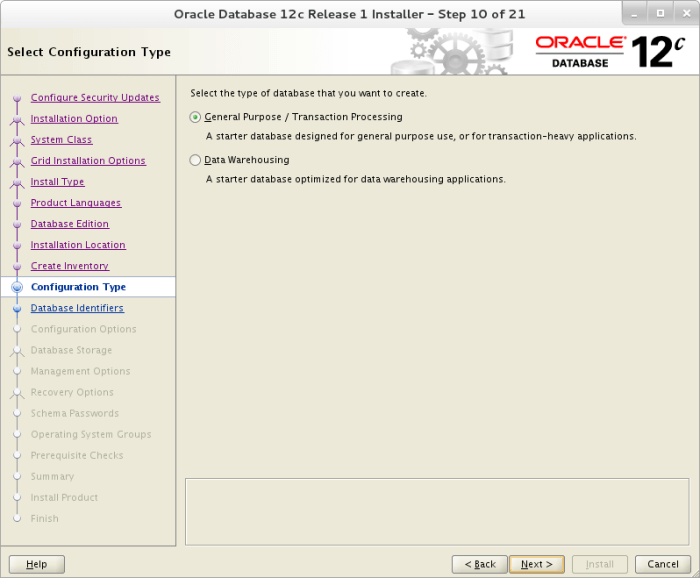
Step 47:- Choose the type of Database you want OLTP or OLAP and click “Next” button.
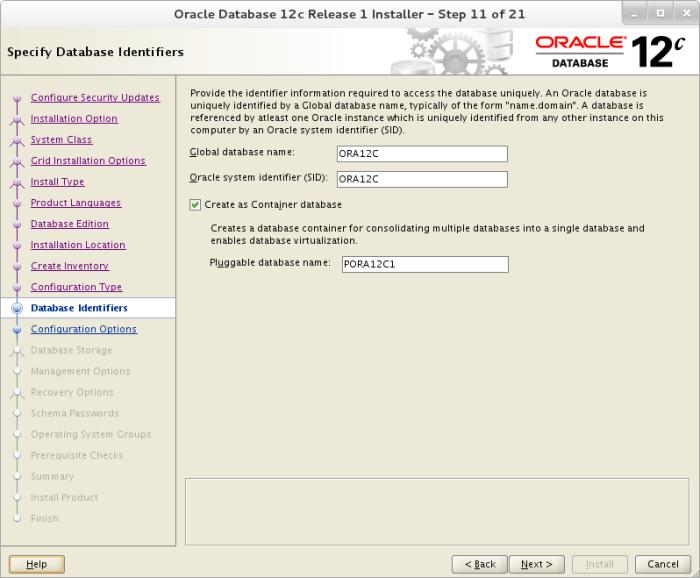
Step 48:- Enter the database name and Check checkbox “Create as Container database” and enter “Pluggable database name” to add your first container and pluggable database and click “Next” button.
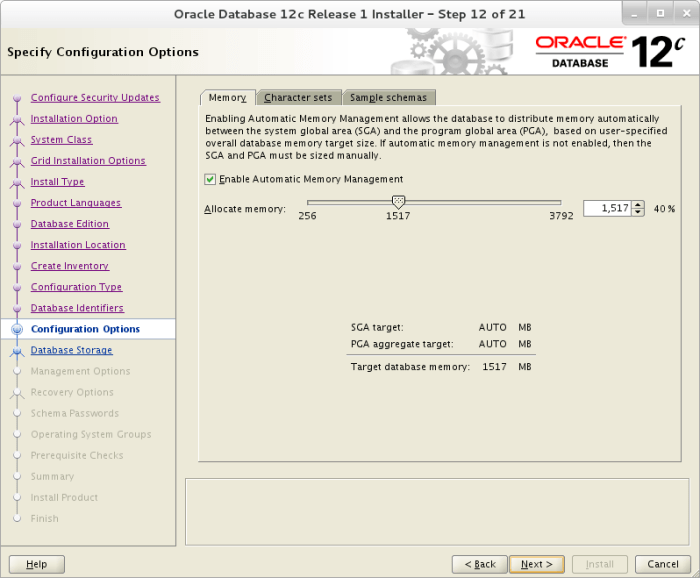
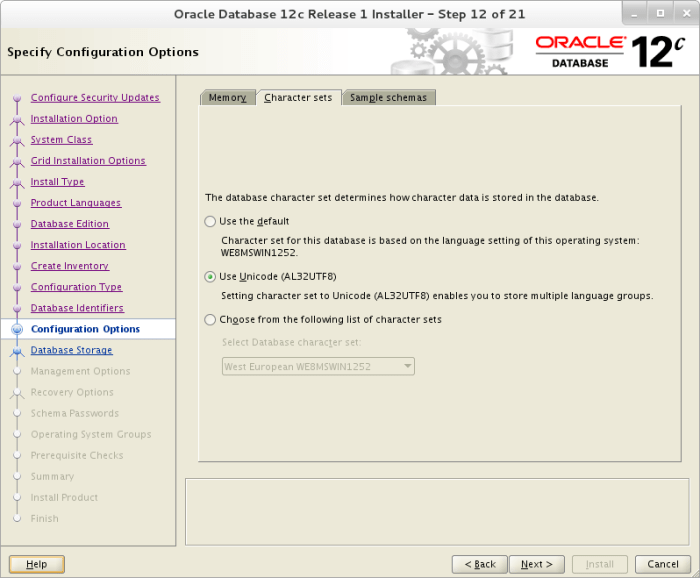
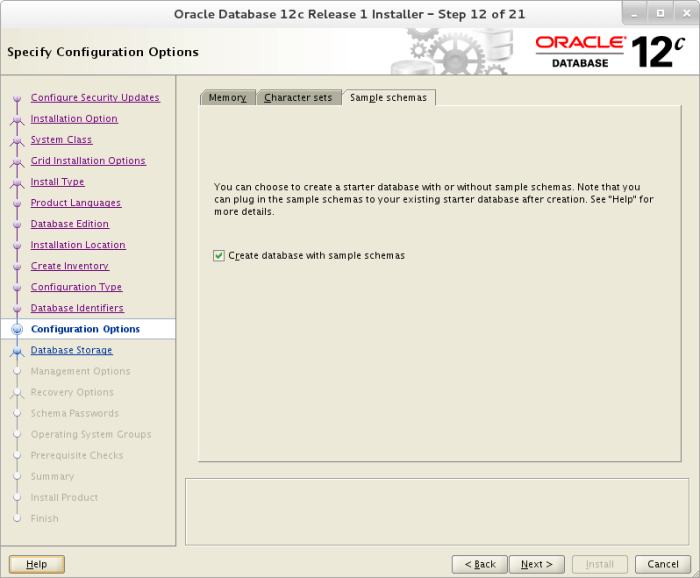
Step 49:- Define the Memory, Character Sets and other properties for the database as per your requirement and click “Next” button.
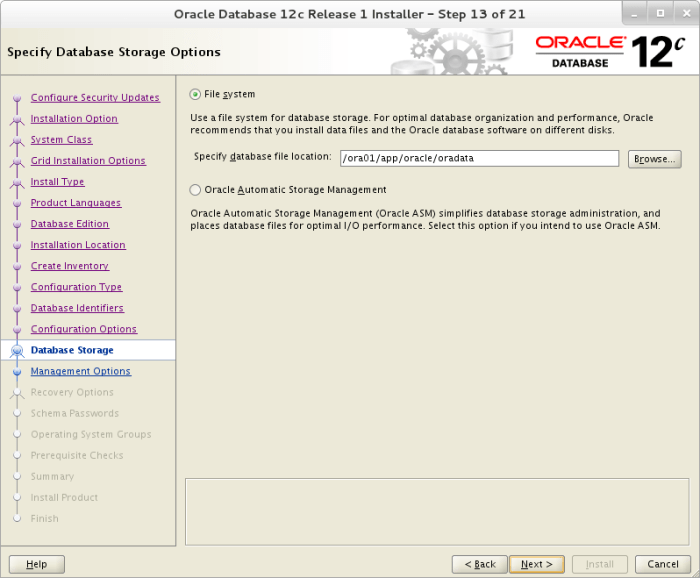
Step 50:- Specify directory where you want to install your database files then click “Next” button.
Step 51:- On this page you can register your database in Oracle Enterprise Manager”. Accept default settings and click “Next” button.

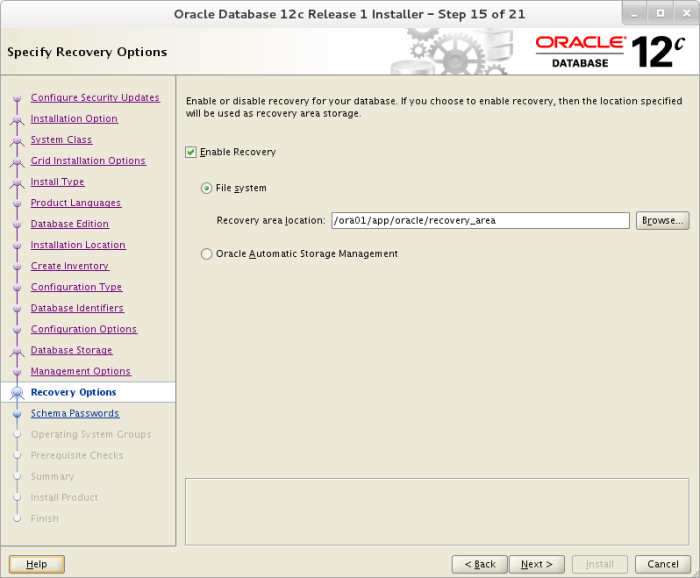
Step 52:- Check checkbox “Enable Recovery” to specify directory for your recovery area “Recovery area location” and click “Next” button.
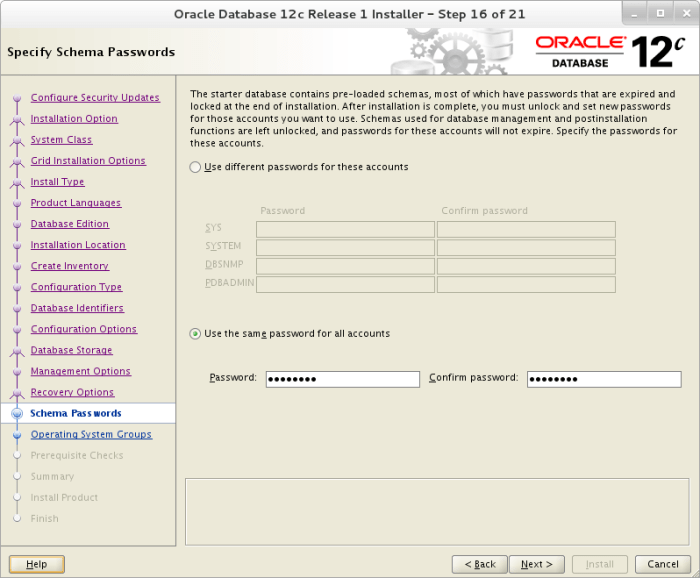
Step 53:- Specify password for each user or enter the same for all. Once it’s done click “Next” button.
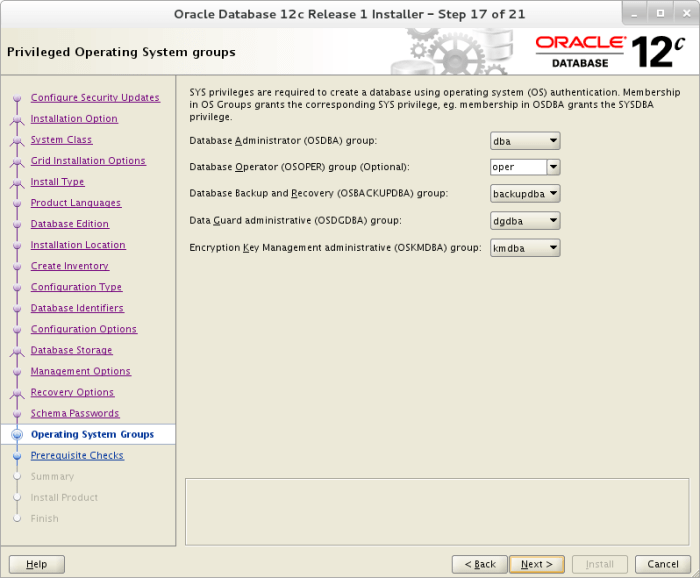
Step 54:- Here you can specify OS group for each oracle group. Accept default settings and click “Next” button.
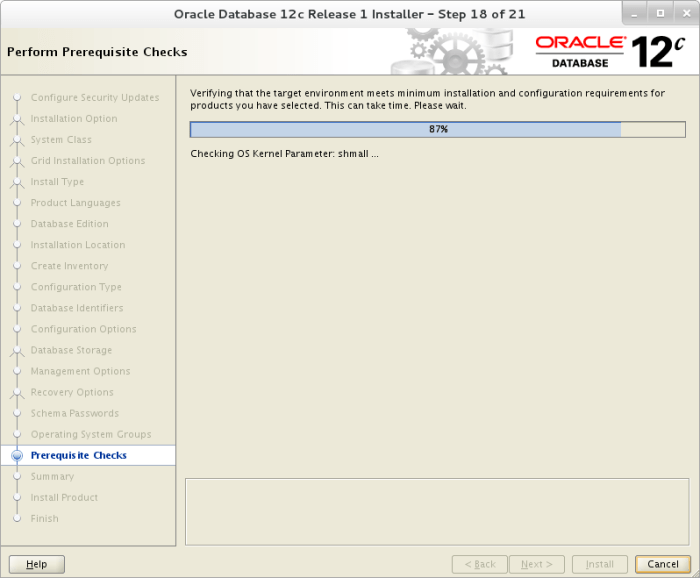
Step 55:- Checks are started to verify if OS is ready to install database software.
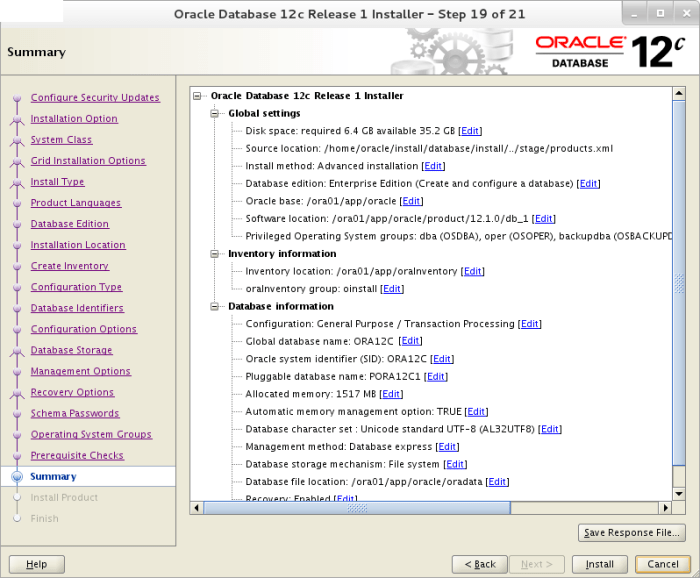
Step 56:- If everything is right click “Install” button. It’s the last moment to come back to each of previous point and make changes.
Step 57:- Installation is started:-

Step 58:- OUI would now prompt for executing some root scripts, execute these scripts from ROOT user.

Step 59:- Installation of Oracle would further continue to create the databases as per the settings chosen previously.

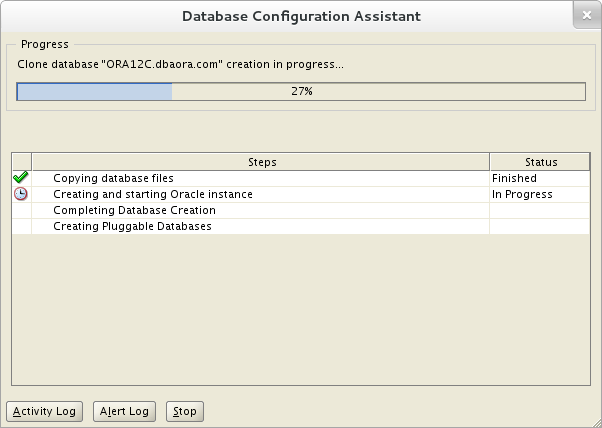
Step 60:- OUI would automatically start DBCA to create the database:-
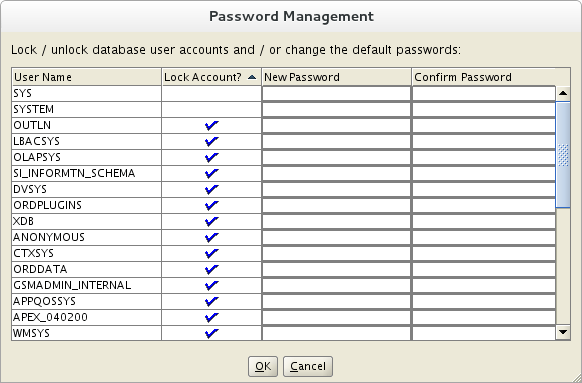
Step 61:- When database is ready you should see summary window. You can click “Password Management” to change passwords for many accounts in database. Once it’s done click “OK” button to continue.

Step 62:- Password management window:-
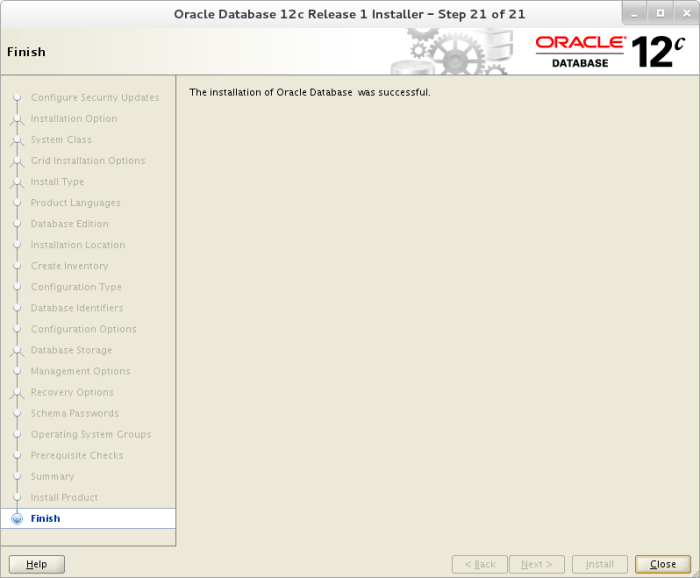
Step 63:- Once through OUI would confirm the successful installation of Oracle 12c.
Now your test environment is set up, play with it, corrupt the files and recover, enable new features and functionality, set up golden gate, data guard, streams, CDC etc, so there is a lot of things to do.
Its not that a DBA is good just because he has faced a lot of issues, but its because how well he knows his database and that can only be learnt in YOUR TEST ENVIRONMENT.
SO GO AHEAD AND KNOW ORACLE…
To read the next article in this series click on How to manage & administer 12c Pluggable & Container database.
hope this posts helps you in creating your own test lab, please comment below in case you face any errors and we would together work on fixing the issues so that the young fraternity members can benefit form the same.

